Soar to New Heights: Printable Paper Airplane Folding Directions
Getting Started with Paper Airplane Folding
Paper airplanes have been a staple of childhood fun for generations. With just a piece of paper and some simple folding techniques, you can create a plane that can soar through the air. In this article, we'll provide you with printable paper airplane folding directions to help you get started. Whether you're a seasoned pro or a beginner, our step-by-step guide will walk you through the process of creating a paper airplane that will impress your friends and family.
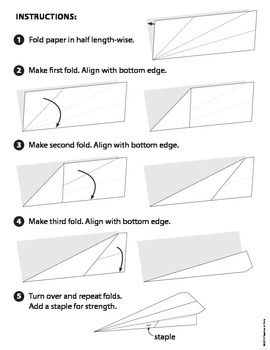
The first step in making a paper airplane is to choose the right type of paper. You'll want to use a piece of paper that is sturdy enough to hold its shape, but light enough to fly smoothly. Once you have your paper, you can start folding. Our printable template will provide you with a detailed diagram of the folds you need to make. Simply follow the instructions and you'll have a paper airplane in no time.
Tips and Tricks for the Perfect Flight
To get started with paper airplane folding, you'll need to begin with a basic fold. This will create the foundation of your plane and help you achieve the right shape. From there, you can add additional folds to create the wings and tail. Our printable template will show you exactly where to make each fold, so you can follow along with ease. With a little practice, you'll be a pro at making paper airplanes in no time.
Once you've mastered the basic fold, you can start experimenting with different designs and techniques. One of the most important things to keep in mind is the weight distribution of your plane. You'll want to make sure that the nose of the plane is slightly heavier than the tail, so it will fly smoothly and evenly. You can also try adding a small piece of tape to the nose of the plane to help it glide more smoothly. With these tips and tricks, you'll be well on your way to creating a paper airplane that will soar to new heights.